
The CRUD is the basis of an application that stores data, we need to create, read, modify and delete them to make the application live.
I will show you in a simple example of a todo list application how to perform these operations through the Eloquent ORM directly integrated to Laravel.
HTTP requests will be executed via the Postman software.
Contents
Data models
In our example we have two models, dashboard and column (a bit like the Trello site) here they are:
Dashboard model
We can see that the model uses the factory with HasFactory, this allows to create fake data.
Then we have the $fillable array in protected that allows to define the fields that are addable/modifiable.
The columns function defines the link between Dashboard and Columns.
The function cardsColumns allows to get the Cards linked to the Columns, we will not see these Cards in the tutorial.
<?php

namespace AppModels;

use IlluminateDatabaseEloquentFactoriesHasFactory;
use IlluminateDatabaseEloquentModel;

class Dashboard extends Model
{
    use HasFactory;

    protected $fillable = ['name','description'];

    public function columns(){
        return $this->hasMany(Columns::class);
    }

    public function cardsColumns(){
        return $this->hasManyThrough(Card::class, Columns::class,'dashboard_id','column_id');
    }
}
Column Model
Same explanation as for the Dashboard above.
<?php

namespace AppModels;

use IlluminateDatabaseEloquentFactoriesHasFactory;
use IlluminateDatabaseEloquentModel;

class Columns extends Model
{
    use HasFactory;

    public function dashboard(){
        return $this->belongsTo(Dashboard::class);
    }

    public function cards(){
        return $this->hasMany(Card::class, 'column_id');
    }
}
Database migrations
Models are not enough in Laravel to create the database, it is necessary to create and fill migrations as well as to execute them.
Dashboard migration
So we have a simple dashboard table with an id, a name and a description as well as the creation and modification dates.
....
class CreateDashboardsTable extends Migration
{
    /**
     * Run the migrations.
     *
     * @return void
     */
    public function up()
    {
        Schema::create('dashboards', function (Blueprint $table) {
            $table->id();
            $table->string('name', 255)->unique();
            $table->text('description');
            $table->timestamps();
        });
    }
....
Column migration
The column has an id, a name, a color and is linked to a dashboard thanks to the foreignId line.
....
class CreateColumnsTable extends Migration
{
    /**
     * Run the migrations.
     *
     * @return void
     */
    public function up()
    {
        Schema::create('columns', function (Blueprint $table) {
            $table->id();
            $table->string('name','50');
            $table->string('color','7');
            $table->foreignId('dashboard_id')->constrained();
            $table->timestamps();
        });
    }
....
Database (Software HeidiSQL)
Here is the visual result of the database with randomly entered data.


We see that we have 4 dashboards, with 2 columns linked to the first dashboard.
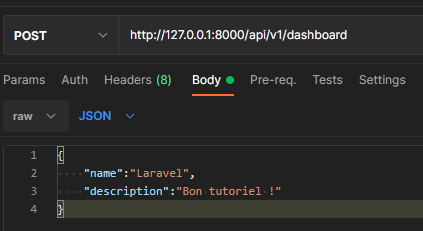
Create data
...
use AppModelsDashboard as Dashboard;
...
public function createDashboard(Request $request)
    {
        $request->validate([
            'name' => ['required', 'min:5', 'max:255', 'unique:dashboards']
        ]);
        $dashboard = Dashboard::create([
            'name' => $request->name,
            'description' => $request->description,
        ]);
        return $dashboard->save();
    }
First of all it is possible to validate the data via the validate function of the Laravel object Request by passing several parameters, in our case we want the name of the dashboard to be unique, mandatory, a minimum of 5 characters and a maximum of 255.
Then you have to use the static create function which comes from the model imported at the top of the file, this one needs an array of data to add to the model, with the names of the attributes in the array keys.
The save method on the created object saves it.
protected $fillable = ['name','description'];Don’t forget the fillable fields in the model, they allow to tell Laravel that these fields can be entered.
Creation of a data linked to another one
Same principle as for the creation of a dashboard, we get the data directly in the object request, without validation for the time being. We also add the id of the dashboard via the field dashboard_id
public function addColumn(Request $request)
    {
        $column = new Column();
        $column->name= $request->column['name'];
        $column->color= $request->column['color'];
        $column->dashboard_id = $request->dashbord_id;
        $column->save();

        return response()->json([$column], 201);

    }
Do not forget the fillable fields
protected $fillable = ['name', 'color', 'dashboard_id'];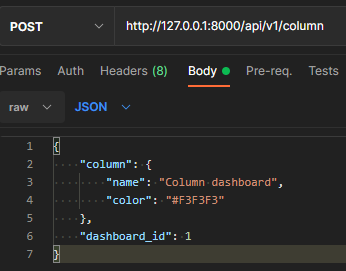
Read data
To get all the data of a table without limits or filters, you have to use the all() method on a model.
public function getDashboards()
{
    $dashboards = Dashboard::all();
    return $dashboards;
}
To retrieve an item you have to use the find method passing the id of the item as parameter.
public function getDashboard($id)
{
    $dashboard = Dashboard::find($id);
    return $dashboard;
}
Reading a data linked to another one
To add the dimension of the items linked to a model, we have to create a function in the model, ours is called columns and makes the hasMany link with the model column
public function columns(){
    return $this->hasMany(Columns::class);
}
Then when retrieving the parent model we call the create function to link with the hasMany the child model
public function  getDashboard($id)
{
    $dashboard = Dashboard::find($id);
    $dashboard->columns;
    return $dashboard;
}
Update a data
In the same way that you add an item, you have to modify the attributes that you want, after having recovered the item with a find.
public function updateDashboard(Request $request)
{
    $dashboard = Dashboard::find($request->dashboard['id']);
    $dashboard->name = $request->dashboard['name'];
    $dashboard->description = $request->dashboard['description'];
    $dashboard->save();
    return response()->json([$dashboard], 201);
}
Delete a data
To delete a data, we retrieve it with the find function and then we delete it with the delete function
public function deleteDashboard(Request $request)
{
    $dashboard = Dashboard::find($request->dashboard);
    $dashboard->delete();
    return response()->json([], 204);

}
You now have everything you need to master CRUD on Laravel with the Eloquent ORM.
It is possible during your api calls to have CORS problems under Laravel.
